
Make a Blog - MS Word
What is this tutorial about?
This tutorial will teach you how to make a great looking blog, using Microsoft Word, a program most people have on their computer. The screenshots of this tutorial are made in Word 2002, but you can do the same thing in other versions of Word.
In addition to MS Word you will also need a graphics program, we suggest that you use Irfanview a free downloadable program that will not ruin the quality of your images like MS Paint will. If you are not allowed to download Irfanview you can use MS Paint as an alternative.
Step 1: Getting Started
First, open up Microsoft Word. We will be using this program for most of the tutorial.
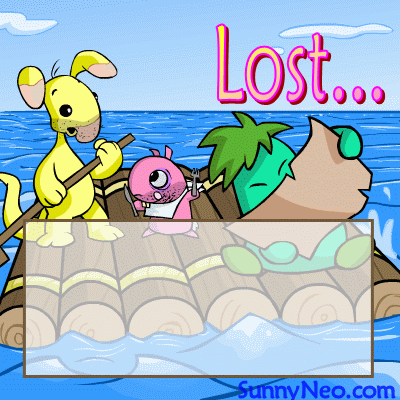
Now it's time to find an image that you will use to make a blog with. In this tutorial we have chosen for this image. Copy the image you would like to use, and paste it into MS Word.
Step 2: Making a rectangle for text
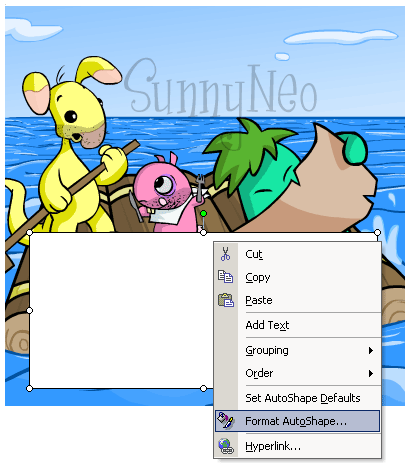
Now click on the rectangle shape in the Drawing toolbar (If you do not have this toolbar, you can activate it in View > Toolbars > Drawing).

Now draw a rectangle on the image. After you are done, right click on the rectangle and click on 'Format Autoshape'.
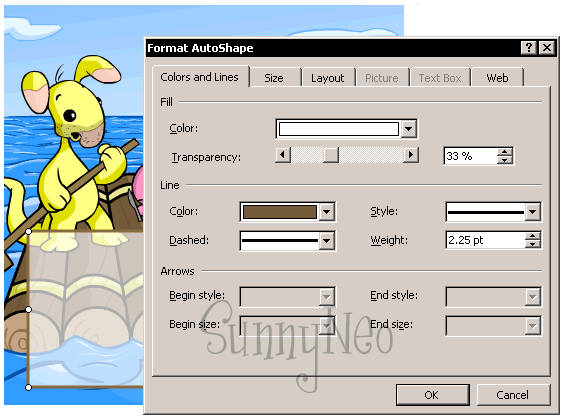
Now go to the first tab in the menu you will be brought to. This tab is called 'Colours and Lines'. In this tab you can choose colours for your rectangle: both the fill colour, and the colour of the line around the rectangle. If you change the opacity your rectangle will become a bit transperant. You can change these to anything you like. We have chosen for the following settings:
Step 3: Adding text
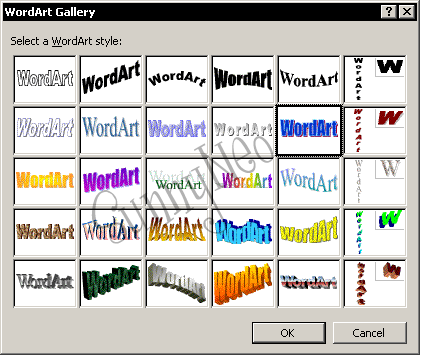
Now it's time to put some text on the blog. For this we will use the function 'Word Art'. You can also find this option in the Drawing toolbar.

When you click on this button you will be shown a gallery of different styles. You can choose one for your blog. We have chosen the 5th one from the second row, but again, which one you choose is up to you. Later on you can change the font type and colours of your text.
On the screen you will get next you can change the font size and font type. This is pretty self explanatory. After you press OK your blog may look a little messed up. But don't worry, we will fix this!
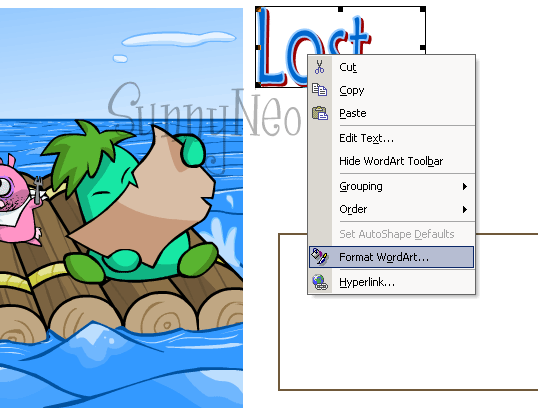
Right click on the Word Art, and click on 'Format WordArt'.
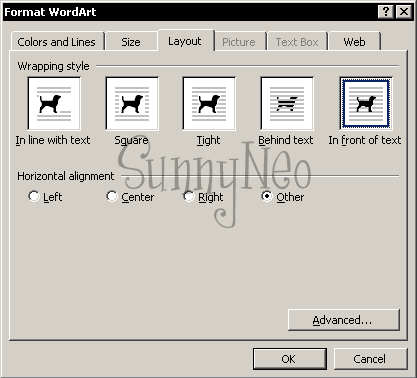
Then go to the third tab: 'Layout'. Make your settings identical to the ones in the image below.
Now you can drag your text op top of your blog. Place it where you think it would look good.
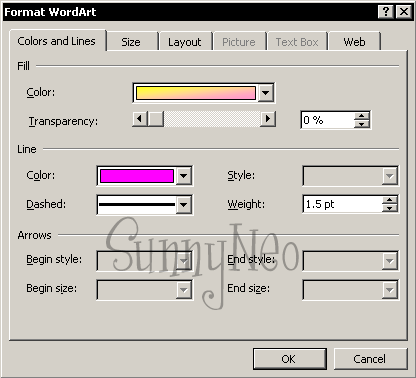
Now right click on your Word Art (it is important you click on the Word Art and not the background or you will get the wrong menu). Click on 'Format WordArt'. This time go to the first tab 'Colours and Lines'. In this tab you can change the colours of your Word Art. We chose the following settings but you can choose any that you like. (We got the mixed colour of pink and yellow by going to Fill Effects in the drop down menu of the fill colour.)
Step 4: Saving your blog
Now your blog is done, all that is left is to save your blog. You can't do this in MS Word, so you will have to get the image into another program. First click on the right side of your blog on the white part of the document. After you have done this none of the parts of your blog should be selected. Then press ENTER a few times so the | that indicates where you are going to be typing wont appear on your screenshot.
Now make a screenshot of your blog, there should be a button for this on your keyboard called Print Screen Key, right of F12, this may be different on a laptop.
Now open Irfanview (or MS Paint if you don't have it).
Go to Edit > Paste. After you've done this your word document will be inside Irfanview (or MS Paint).
Now select your blog (just the blog, leave out the white background of the Word document, if it helps, use the magnifying glass). Then go to Edit > Crop Selection.
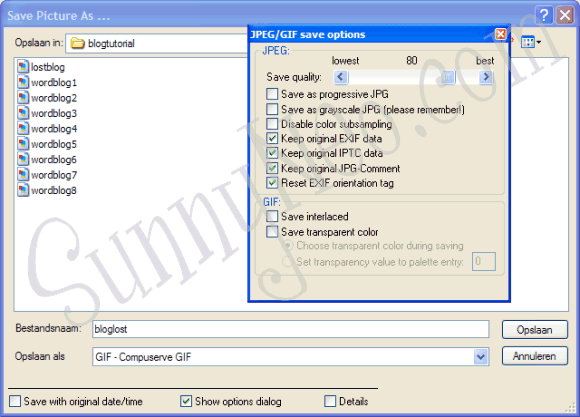
Now you will have just your blog left! Now all you have to do is save it! Click on File > Save As. You will want to save the image as a GIF - Compuserve GIF.
And you are done! Here is your end result! To code your blog see our Blog Coding Tutorial. To upload your image, see our Uploading Images Tutorial.
 {{ loadingMessage || 'Loading, one moment please'}}

