The Return of Dr. Sloth Plot
WALKTHROUGH - Chapter 11
|
||||||||||||||||||||||||||||||||||||||||||||||||||||||
 | ||||||||||||||||||||||||||||||||||||||||||||||||||||||
|
Step 1 - Read Chapter 11 of the comic to see what is going on.
Step 2 - Fight! The third wave of challengers of the plot are out. Go beat up that evil Primary Grundo Bot RZ894 for The Resitance. NOTE: Battling in the Battledome will give you extra points, but is not necessary. You can continue with the plot without participating in the battles.
Step 3 - New plot steps :o. Head over to Sloth's Space Ship - Token Testing. This is actually all the info we can give you right now. No one here at SN currently has the time to work on the plot steps x_x. Hopefully later we will know mroe of what is going on and can update. We suggest you head over to the RoS Neoboard to see if anyone has some suggestions as to what to do. In this step there are 4 things you can do, it is similar to the tale of woe where you were fetching, and digging and such. The activities are:
Testing StationTesting Station - 1st part - Heat Test To join a testing station you can enter a room number into the box and click engage in teleportaion or you can check the box and have it pick one randomly to put you in and then click the button to engage in teleportation. You need 4 people in the room (like digging) to start the activity for the testing stations.
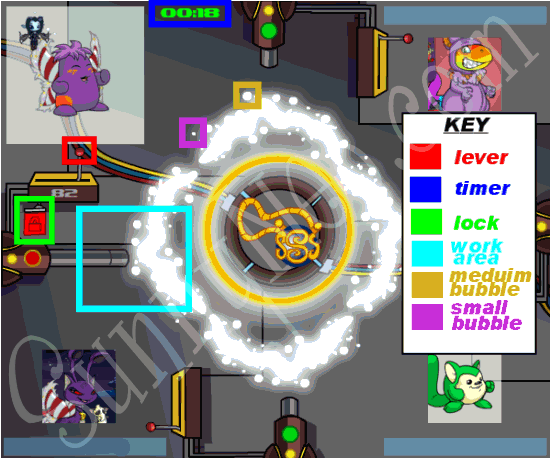
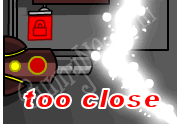
Once there are 4 people in the room, you can click the button to start the round, although the timer will start counting down from 30 seconds even before you click the button, so be sure to be paying attention. Once the round has been started, you have 30 seconds, to click and drag the red lever, which moves the metal beam until it is in the right position. You need to then click the green lock, to turn it red, and make it LOCKED, otherwise it wont accept your position, and you will be kicked out of the room. The screenshot above shows the approximate right location. Every round the glowy thing moves position though, you want to line your metal beam up so that it would be barely touching the outside of the meduim sized bubbles and the outer little bubbles are on top of the metal beam.
There are 3 rounds to this before you move onto the next part, if you mess up round 2, or round 3, you will start back at round 1 and have to work your way back up again. When you are all done you will see this:
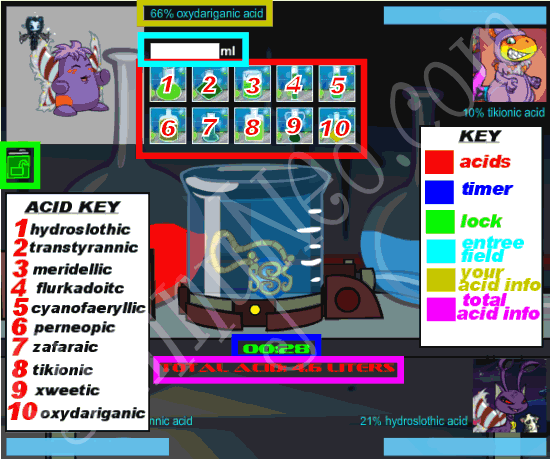
Testing Station - 2nd part - Dissolving Test When you are all through with the 1st part, it moves you onto the second part. Yet again you need to have 4 people to do this, and if you dont lock in your answer, you can be kicked out of the room for 2 minutes before you can join again.
The way to get through this part is with some math. Follow these steps:
You have 30 seconds a round to complete this as well. There are 3 rounds you need to pass to move onto the third step in the testing stations. Testing Station - 3rd part - Gravatics Test
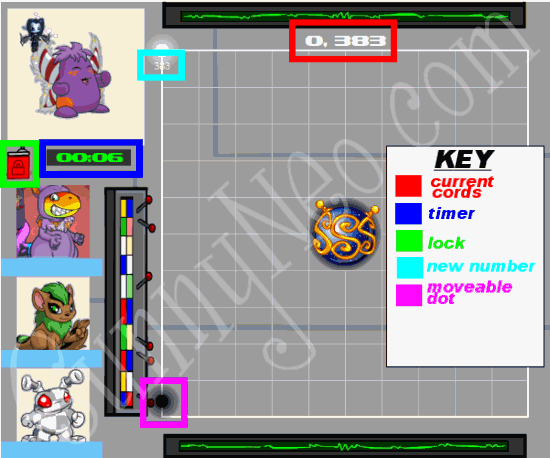
You receive 3 glowing orbs in this step. The goal here is to place the third one exactly a away from the first orb and b away from the second orb. You start with one black glowing ball. This first ball you need to place at cords 0, 0. Then hit your lock to lock it in. Then after sometime, the ball will turn white and you will get a white number below it, for example, 140. This would be your variable a. Move the new black ball that pops up to be at the cords either (a, 0) or (400, 0). If your first number a was greater than 400, put it at (400,0). Otherwise, put it at (a, 0). Then be sure to lock it in again. Then a new white number will show up below the second ball you placed, for example 66. Lets call this number variable b. A new black ball will appear. You need to move this one to the correct spot. The way you get x,y cords of this one is some fun fun math x_x. If you put your second orb at (a, 0), use this formula: x = (2a^2-b^2)/(2a) y = sqroot(a^2-x^2) Otherwise, use this formula: x = (a^2-b^2 + 160000)/800 y = sqroot(a^2-x^2) So in our example above we had a=140, b=66. So we plug it into the first equations it will look like this: x = (2(140)^2-(66)^2)/(2(140)) = 124.4428... = 124 (rounded) y = sqroot((140)^2-(124)^2) = 64.9923... = 65 (rounded) So you would place your third black dot at the cords 124, 65. To speed up the calculation, you can set up an excel spreadsheet and just pop in the numbers. To set up the spreadsheet, use 1 cell for your a variable, 1 cell for your b variable, 1 cell for the x formula that uses the cells for your a and b variables, and then 1 cell for the y formula that uses the x formula and a variable cells. Then when you get your a variable type it in the cell, then when you get your b variable type it into the cell and the equations will update and display your current correct x and y values.
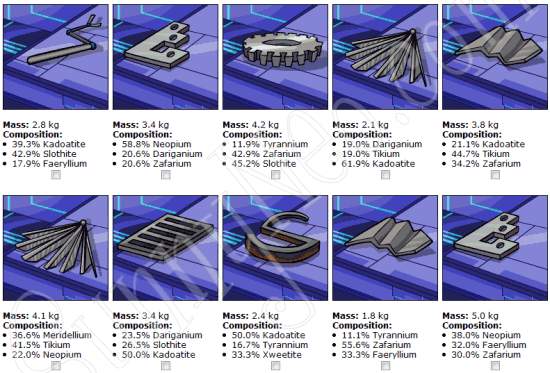
In the screenshot you can see a way that we set it up, which is currently showing you the formulas, but you will want it to not show the formula but the result instead when you are using it. There are 3 rounds to this as well... and we arent sure what comes after you finish all three rounds. Kendall is not so hot with the quick math skills x_x plus all 4 of us in the room have to do it right every time XD. Heat Test: Create control rodsIf you click on the pot filled with hot metal, it will take you to the Making Control Rods part of this step. The object for this step is to take the scrap metal pieces that they give you, and melt them down to form a heat rod. When you go the the making control rods page, your page will look something like this:
Everyone's looks different, and it will be different everytime you go to create a new rod. There are 10 metals and a certain specific weight you need to form the rod. Here is the list of the metals and the weights needed to form a rod out of that metal.
Now what you need to do is look at each scrap metal option you have. You are trying to figure out what combonation of scrap metal will give you one of the above weights in the right metal. Make sure not to exceed 10kg total though. All the pieces of scrap metal you are using, combined weights must be less than 10kg, or your rod will fail.
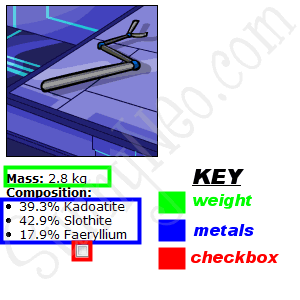
The way you figure out how much of weight of each metal your scrap piece has is by taking the total weight of the scrap piece and multipling it by the percentage next to the metal. So in our example above our scrap metal piece weighs 2.8kg. It has 39.3% Kadoatite in it. So take 2.8 * 39.3% or (.393) = 1.1004. You need to round to the nearest tenth, so you round this one to 1.1. This piece of scrap metal has 1.1kg of Kadoatite in it. To make a rod out of Kadoatite though we see that we need a total of 3.3kg. You would check your other pieces of metal that have Kadoatite in them and figure the weights, and then see if any combo of them equal to 3.3kg. If they did you would checkbox all the scrap metals that make up what is going to go in your rod, and then click the button. After you click the button to make your rod, you have to wait 180 seconds to see if you made the rod correct. After that hit the update status button and it will either take you to a success page, or a failure page. There are a few different ways you can go about figuring which rod you need to make.
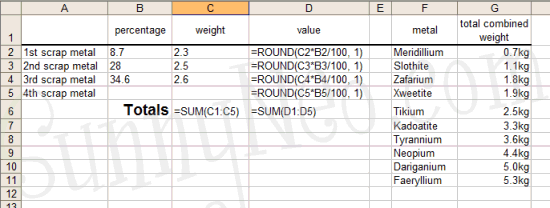
Excel or any other spreedsheet program, can also help you greatly with this step. You can either do a basic one where you just plug in play your numbers and have it do your math for you, or you can go all out and set one up that will even put together all your combos and such. Granted the larger one takes a bit more time to set up, if you dont plan on making a lot of heating rods, we don't suggest you bother since it takes awhile to input all the formulas for each combo and such. Here is a screenshot of a basic excel file with the formulas showing
You would pick a metal to test for, and go through and plug in the percent as a number so like 33.3% is just 33.3 since it does the division in the formula for a percent. Then plug in the weight and it will figure the amount, then put in the next amount and so on. Watch the total at the bottom since sometimes you may have 5 scrap metal pieces with the metal you are testing but it might only take 2 to make your rod. Dissolving Test: Create acid solutionsWe are currently trying to create working formulas for the acid testing. In order to do this we need your help. Please submit your data (successful or failed) in our Submit Acid Test Results Page. Thank you! After the token was found The following conversation appeared on the Token Testing page. You can still test tokens for plot points, but the actual Space Faerie Token was already found.
- NOT THE END OF CHAPTER 11, we just dont have time to do more tonight - Back to top | ||||||||||||||||||||||||||||||||||||||||||||||||||||||







 {{ loadingMessage || 'Loading, one moment please'}}

