
Outline Tutorial for Paint Shop Pro
What is this tutorial about?
This tutorial will teach you how to make smooth outlines. This method can be used for transparent badges, banners, cropped images or just for text.
In order to continue with this tutorial you will need a program called Paint Shop Pro. You can download a trial if you don't have the program already. In this tutorial Paint Shop Pro X2 is used. If you are using a different version of PSP things might look a little different for you, but the overall idea will be the same.
Step 1 - Getting Started
First, open Paint Shop Pro.
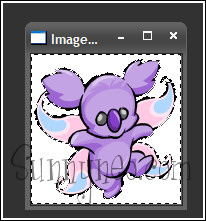
Now find yourself a nice image you want to use for this tutorial. In this tutorial this cute Harris Shopkeeper image is used. When you have found an image, right-click it and select "Copy".
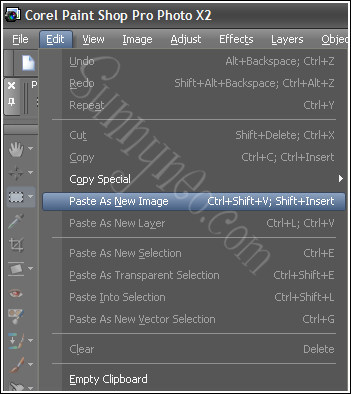
Now go back to Paint Shop Pro and click on Edit > Paste as New Image.
After you have done this, your image will be pasted into PSP.
For Internet Explorer users only:
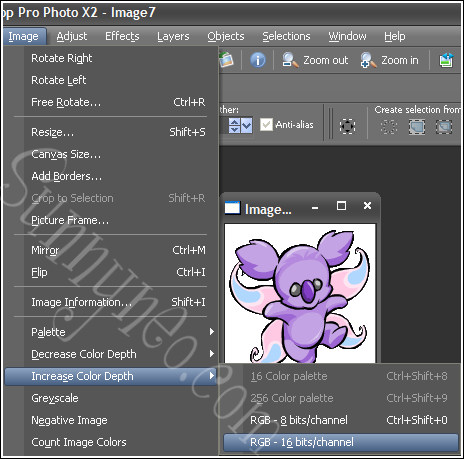
As you can see, on the right of the screen, in the Materials palette, we only have a few colours to use. So now it is time to fix the colours. You can do this by going to Image> Increase color depth> RGB - 16 bits/channel, or press CTRL+SHIFT+0.
Step 2 - Making the image background transparent
For the best effects of a "Feathered Outline", you need a transparent background. If you already know how to make the background transparent you can skip this step.
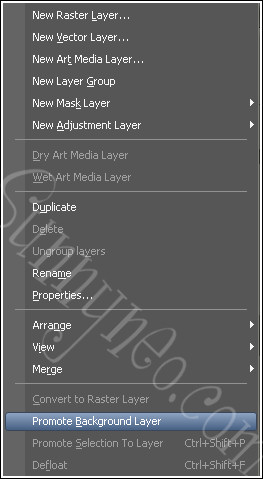
First, find the layers section at the right bottom of the screen. Right-click the layer called "Background" and select "Promote Background Layer".
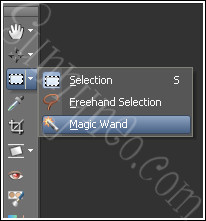
Use the Magic Wand Tool to select all the white background parts.
Using the magic wand tool, make sure the tolerance is at five, and that it is on Add mode. If you're using Paint Shop pro 9 or above, ensure you have the check box marked contiguous, selected (this means that only the area adjacent to where you clicked will be selected). Also make sure the Anti-Alias check-box is selected.

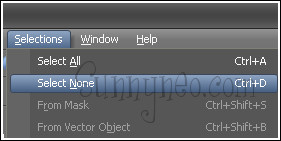
After you've selected the background you press "Delete" on your keyboard. Then go to Selections > Select None.
Now you click Edit > Copy.
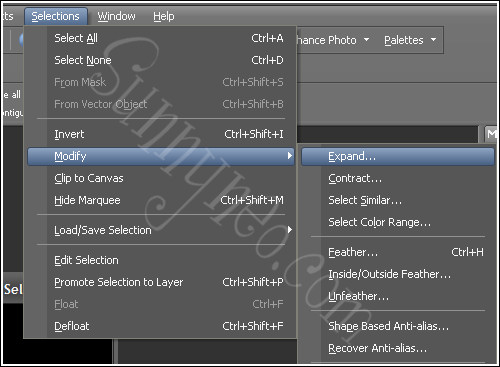
Step 3 - Making the Outline
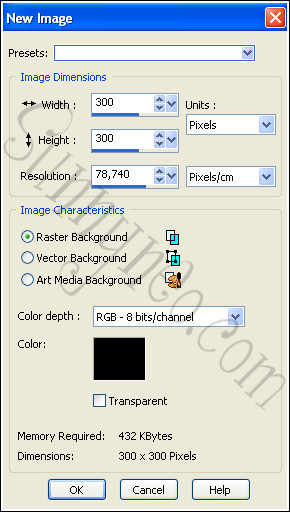
Go to File > New. Make a new canvas from 300 x 300 pixels. The background colour is the colour you want for the new outline. In this tutorial the outline will be black. Make sure the new image is wider and higher than your transparent image.
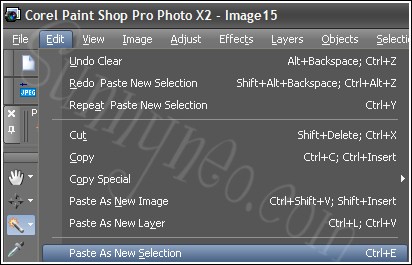
Go to Edit > Paste As New Selection to paste your transparent image on the black canvas.
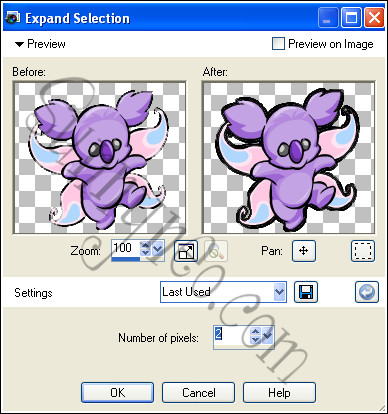
The image is now your selection. To make your outline, click Selections > Modify > Expand. If you are using an older version of Paint Shop Pro you may get a warning that you must change your selection into a non floating layer. If this is asked, press OK and continue with the tutorial.
I usually expand the selection two or three pixels.
Step 4 - Feathering the Outline
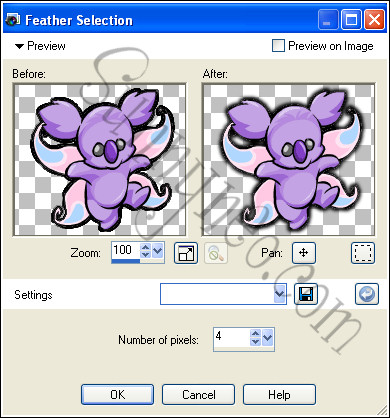
To feather the outline, go to Selections > Modify > Feather.
Select the amount of feather pixels. I usually use two, three or four pixels. You can use this method for images, but also for text.
Step 5 - Finishing the Image
Now go to Edit > Copy and then Edit > Paste As New Image.
Now you're done! You can save your image as .gif if you want it to stay transparent.
Final Result:

 {{ loadingMessage || 'Loading, one moment please'}}

