
Blinkie Tutorial for Photoshop
What is this tutorial about?
This is a tutorial to learn how to make blinkies using Photoshop CS and Adobe ImageReady CS. You could also use this tutorial in other versions of Photoshop, but the buttons and such wouldn't be in the same spots. You can download a 30 day trail version of Photoshop at PhotoshopSupport.Com
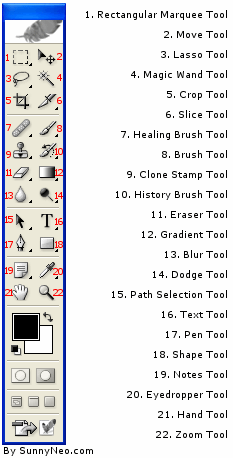
The tools
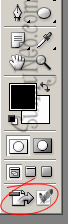
To avoid any confusion you can see an overview of all the Photoshop tools below, including their names and numbers.
Step 1: Getting started
The first thing to do is of course open Photoshop. You will not need to open ImageReady at this time. So, open up Photoshop. Open a new document by going to File > New. Match the settings below (name is not important).

Step 2: Choose an image
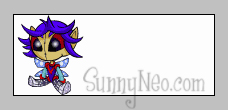
Now you need to find an image to make into a blinkie. For this tutorial, we're going to use the Space Faerie Plushie image. Copy it and paste it into your Photoshop document using Edit > Paste.

Select the Move Tool (tool #2) and drag the image to the left of the canvas, so it looks like this.
Step 3: Make the blinkie boxes
The next thing we're going to do is make the little blinkie boxes. Start off by making a new layer. Go to Layer > New > Layer, or hit Crtl+Shift+N. Keep the name as Layer 2, and hit OK.
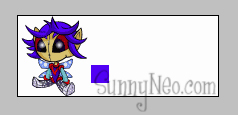
Now select the Rectangular Marquee tool (tool #1). Set the style to Fixed Size, 18px wide and 18px tall. See the image below.

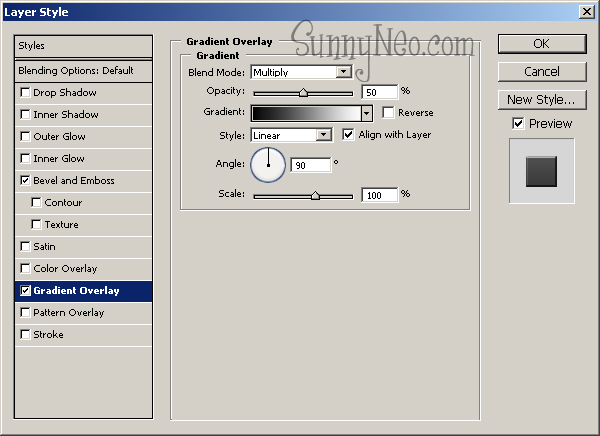
Click on the canvas to create a small outlined box. Move it so it's close to the plushie.
Select the Bucket Tool (Tool #12, it's under the Gradient Tool, right click on that tool and a menu will appear where you can choose the Bucket Tool).
Now you need to set the colour that you want to use to fill the box. You can do so on the right side of the screen. In the colours menu you can click on the little square. If you do this a menu will pop up where you can choose the colour, make it #0000F8. Then and fill the box with this colour with the Bucket Tool.
Hit Ctrl+D to deselect the square. Your image should look like this.
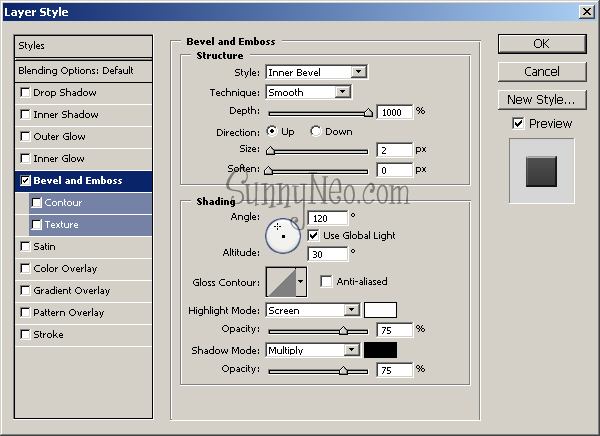
Now we're going to add a bevel. Go to Layer > Layer Styles > Bevel and Emboss. Make your settings match the ones below (from the default settings the only things that have been changed are Depth and Size).
Now we're going to add a slight gradient. Click on Gradient Overlay on the left hand side of the box that popped up. Make your settings match the ones below.
Got it? Great! Your canvas should look like this now.
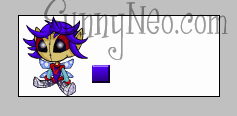
Now we're going to merge Layer 2 so it's bevel and gradient overlay don't effect any layers that we merge into it later on. Click on Layer 1 (the one with the Space Faerie Plushie) and create a new layer (Crtl+Shift+N). Keep it named Layer 3, then click ok. Click on Layer 2 and hit Crtl+E to merge Layer 2 with Layer 3. You should now have a Background, Layer 1, and Layer 3.
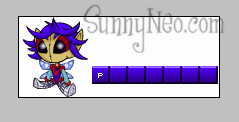
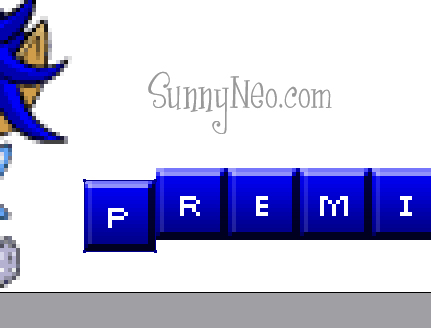
What we're going to be blinking has 7 letters, so we need to make this one box into seven. Click on Layer 3 and hit Ctrl+J to duplicate the layer. The new box will be right on top of the first one. Move the new box using the Move Tool (#2) so the left edge is touching the original boxes right edge, like this.
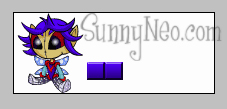
Now let's do it again. Hit Crtl+J to duplicate the layer, and move it to the edge of the previous layer's box. Keep doing this until you have 7 boxes, like this.
Step 4: Adding text
Time to add the text. First thing's first, we need a pixel font. A good one is Redensek. If you don't have it, you can download it here.
Now, select the Text Tool (#16), and make sure you have the following text settings.

Now, with the Text Tool still selected, click on your first box. It doesn't have to be centered yet. Type the letter "P." Change the text's color to white (using the Colors Menu on the right of your screen), and drag it to what you think the center of the block is with the Move Tool.
Now, hit Ctrl+J to duplicate the layer. Hold SHIFT while moving the new P to the middle of the 2nd block with the Move Tool (this will keep it even with the original text layer).
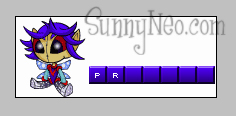
Select the Text Tool again, and click on the 2nd P. Erase it, and type "R".
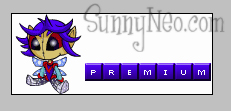
Time to rinse and repeat. Ctrl+J, move it to the middle of the 3rd box with SHIFT, erase the R and type "E." Ctrl+J, SHIFT, move, erase, type "M." Ctrl+J, SHIFT, move, erase, type "I." Ctrl+J, SHIFT, move, erase, type "U." Ctrl+J, SHIFT, move, erase, type "M." This is what you should end up with.
Step 5: Merging
Now, it's time to merge the text with the boxes. In your Layers Palette (bottom right) click on your "P" layer to select it. Drag it way way down so it's above "Layer 3."
If you don't see your layers palette go to Windows > Layers, or just hit F7.
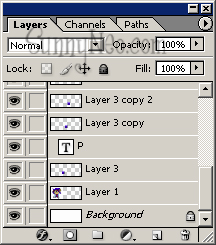
Make sure your "P" type layer is selected, and that it's above "Layer 3" and hit Ctrl+E to merge P and Layer 3.
Double click on the text Layer 3 in the Layers Palette, change the name to box1.
If you can't manage to do that, just right-click the layer and go to "Layer Properties" and change the name there.
Now, scroll back up in your layers palette and click on "R." Drag it way way down so it's right above "Layer 3 copy."
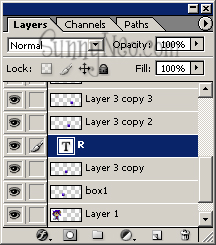
Make sure your "R" type layer is selected, and that it's above "Layer 3 copy" and hit Ctrl+E to merge R and Layer 3 copy. Rename Layer 3 copy to box2.
See where we're going with this? E merges with Layer 3 copy 2, rename it box3. M merges with Layer 3 copy 3, rename it box4. I merges with Layer 3 copy 4, rename it box5. U merges with Layer3 copy 5, rename it box6. M merges with Layer 3 copy 6, rename it box 7.
You should now have "Background" "Layer 1" and "box1-7."
Step 6: ImageReady
We're done with the blinkie in the Photoshop standpoint, time to go to ImageReady. To transfer your progress to ImageReady, click the ImageReady button, or hit Ctrl+Shift+M.
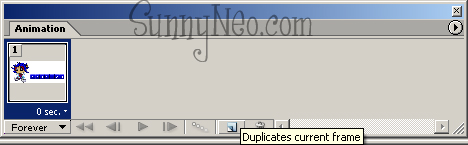
You're going to need 8 frames to animate your blinkie--one for each box, and one for a pause. Click the "Duplicate Current Frame" button 7 times.
If you do not have the Animation Window, go to Window > Animation.
You should now have 8 frames. Click on frame 2.
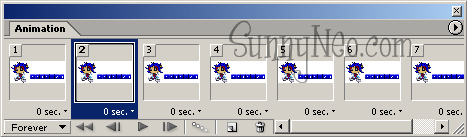
Click on box1 in your layers palette, and click on the Zoom Tool. Right click on your canvas, and click "400%." Click on the Move Tool and drag the P box in layer box1 down about 3 pixels or so.
Now click on Frame 3. As you can see, box1 went back up to its normal position. That's how we want it. Click on box2 in your layers palette, select the Move Tool, and drag the box down about 3 pixels or so.

Click on Frame 4. Click on box3 in your layers palette, select the Move Tool, and drag the box down about 3 pixels or so. Do the same with Frame 5--box4, Frame 6--box5, Frame 7--box6, and Frame 8--box7.
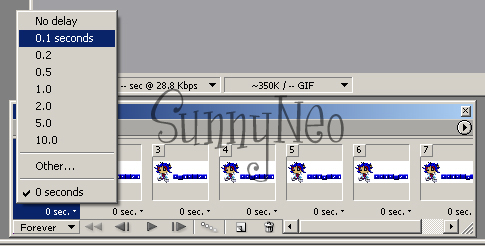
The last thing to do is change the speed of each frame. Right now the blinkie is very fast, which takes away from the effect, so we're going to slow it down. To do so click the "0 sec." and click "0.1". Do this for every frame.
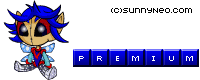
Now all that's left is to save it. To do so, click File > Save Optimized As and save it. This should be the final result:
All there is left to do now is for you to upload the blinkie on a host that allows you to direct link your image. Try SunnyNeo's Uploading Images Tutorial if you need help uploading your image.
How to put the blinkie in your lookup:
First change your full name at your User Info to:
<u>.</u>
(You can put your name behind, or in front of the <u>.</u> if you like. If you remove the period between the <u></u> the blinkie won't work!)
Every time you go and change your user info, you will need to make sure the <u>.</u> is still in your name. if you don't do this and you click 'Change your details', it will take the coding out and the blinkie will no longer work.
Then add the following code to the 'About Me' box on the same page. You'll need to alter the code to match your own blinkie; add the image url, height and width of the blinkie in the code.
 {{ loadingMessage || 'Loading, one moment please'}}

