- First of all figure out what image you want to make your blinkie with. For this example we are going to use the luxury acara plushie. You can either save the image to your computer and then open it or you can right click and hit copy.

- Now you need paint shop pro open. So open paint shop pro.
- Once you have paint shop pro open you want to have the following toolbars/palettes open...
toolbars: web, tools
palettes: materials, tool options
If you do not have these open then you can open them by going up to your toolbar (file, edit, etc.) and clicking on view... toolbars or palettes, and clicking on the ones I said you need opened.
- If you copied the image, go up to edit... paste... as new image. If you saved it to your comp go up to file open... and then find the image to open.
- Once you have the image open you need to make a new image, this will be your blinkie.
- Go up to file... new... make your new blinkie 85 pixels in height and then depending on how long the word in your blinkie, matters on your width, I couldn't imagine your blinkie needing to be more than 300, so make it 300 for now, you will be able to figure out the more you make what your width should be.
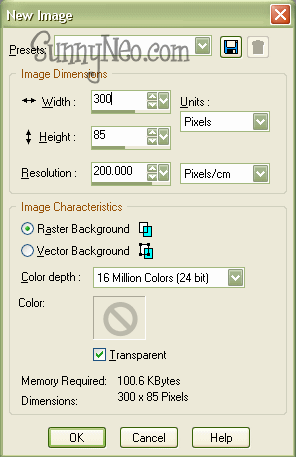
- Now you need to make your background transparent, so click the little box that says transparent, so you have no background for your new image. Then click ok, so your new image is up.
- Now go back to the image you opened or pasted. The luxury acara plushie. You need to increase the color depth to 16mil colors, you can do this by going up to the top where file, edit, and all that stuff is, and click on Image... increase color depth... 16 million colors.
- Now you need the magic wand tool. The selection tool has a little black arrow next to it, click on that arrow, so you can get your magic wand tool.
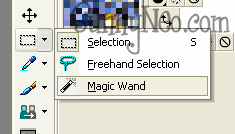
- On your tool options palette make sure the number is set to 66. The higher the number the less picky it gets about exact color, this way we will be able to select even the gray pixels around the outline and get just the image. Now using your magic wand tool, click on the white around the outside of the luxury acara plushie. It will select all the white around it, however we don't want the white, we want the item, so now go up to selections... invert.
And it will select the item in the middle. Now go to edit... copy... And then head back to the new image we created for the blinkie, click on it so it is active, then go to up edit... paste... as a new layer. Your blinkie image is now in our blinkie workspace.
- Move the image to where you want it to be at in your blinkie.
- Now it is time for the boxes. Using the eyedropper tool, left click the color you want the outline of your box to be, and right click the color you want the inside of your box to be. I am going to use Black as my outline so I am left clicking on something black, and then light blue as my inside so I am clicking on whatever light blue in the image there is.
- Now go to the shape tool. Click on the rounded rectangle, or whatever shape you want, make sure the retain style box is NOT checked, and that anti-alias and create as a vector is checked. On the tool options bar change the width to 2.
- Draw your first box, make it the size you want your boxes to be, remember you have to be able to fit letters in the boxes, so don't make them to small, but you don't want them too large either or it will look funny.
- After you have the first box drawn and the size you want it, click on it so it is selected (if it already isn't) then go up to edit... copy. This will copy your box that you have selected. Now go to edit... paste... as a new vector selection. This will paste the box as a new object so you don't have to redraw it every time. Continue pasting boxes until you have however many you need. My blinkie so going to say evil, so I need 4 boxes total.
- After you have all the boxes pasted, go through and line them up so they look how you want and are not all one on top of another. Once you have that done, it is time for the text.
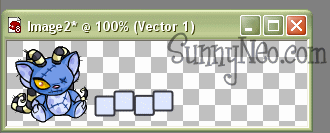
- You can use the eyedropper tool to select what color you want the text to be, if you did a light colored inside of the boxes, then do a dark text, if you did a dark color inside the box, do a light colored text so that you can see it. You will want to right click the color you want so that it is the fill color, cause you probably wont want an outline color for this. So click on the A, which is the text tool.
- You should have your color you want as your text on the bottom of the color thing, and then click on the circle with the line diagonally across it below the top color to the right, to get rid of the top color, so all you have is the one color. Then click in the big empty void ABOVE the boxes, not on the box. Pick whatever font and size you want, and then type the first letter of your word, so in my case an e. Then hit ok.
Now move the first letter on top of the first box. Position it in the middle. And you have your first box done.
- Now you just need to go through and put the rest of the letters into place, by doing the same technique, click, type, move. Until all your boxes have their letters.
- Now you need your shape. Using the eyedropper tool select the colors you want to be the border and inside of your shape, yet again left click will do border color, right click will do inner color. Then click on your shapes tool again, and select whatever shape you want, I like to use stars :D You probably want the width to only be 1 for this though. Then draw your shape, you want it to be smaller than your boxes, but still big enough to see or realize what it is. Once you draw the shape you can move it into place which will be right next to your image and to the left of your first blinkie box in the air.
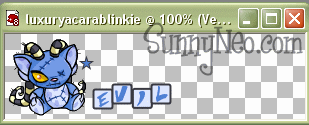
- Now it is time to save your basic blinkie. This will be your template. You have everything on there that is needed. So go up and click on file... save as... Save it as you want, I save mine like luxuryacarablinkie and then save it as a .psp file.
- Now that you have the basic template saved it is time to save it as your first frame. Every time a blinkie moves it is a new image, and you have the first image made now (template) so now you need to save your first one so you can make the rest. Go up to the gif optimizer.

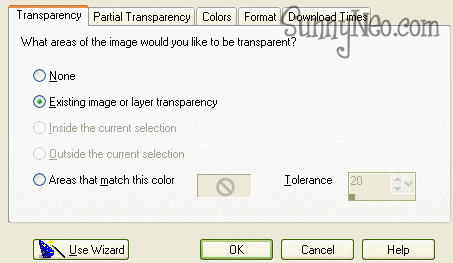
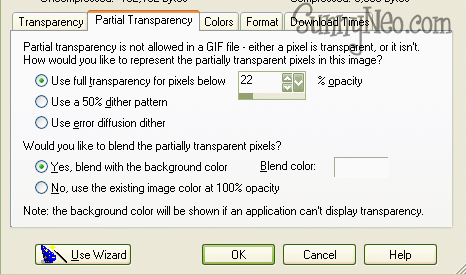
- A window will open up. You want to click on existing transparency. On the 2nd tab, partial transparency have Use full transparency for pixels below: 22 and then also yes blend with the background color, and then choose white (depending on what the background color of wherever you are putting the blinkie is what you will put here, but white is the usual safe choice) checked. Then hit ok, it will ask you to save it, leave the name as it is but put a 1 after it, so save it as luxuryacarablinkie1 and then hit ok. It will save it as a gif since you did the gif optimizer.
- Now you need to make all the rest of the images.
- Using the object selector, go and click on the letter in your first box. Then hit the delete button to get rid of it. After that double click on the box to pull up its options, you want to turn the inside the color of the outside, so click on the outside color to get the color code, copy the html coding, then go back and click on the inside color, paste the html coding in, so that it will make it the outside color, and then hit ok. Hit ok again to get out of the options screen, and the box will now be all one color. Still using the object selector, move the box down a bit, not too much just a little. Then move the shape you have on top of the box. You now have your second frame.
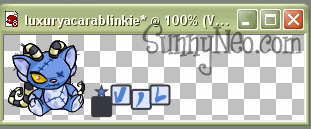
- So now you need to save your 2nd frame. You don't need to save as a psp file, cause you only want the basic template saved as a psp, you only need to save it as gif.
So go to the gif optimizer again, all your settings will be saved from your last thing, so just hit ok. And then type in your name with a 2 after it, so now it is luxuryacarablinkie2 and
then hit save.
- After you have saved the second image it is time to undo all the changes we made so hit, ctrl + z (or go up to edit... undo) until you have what is the original blinkie again.
- Time for the 3rd image, this one is really easy. Just take your shape and move it in the air above the 1st and 2nd boxes. This is your 3rd image.
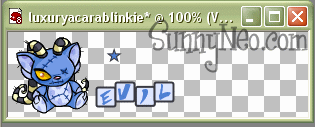
- Now it is time to save again, go up to the gif optimizer, all the things are the same, hit ok, and then save it as luxuryacarablinkie3.
- You don't need to undo anything after you have moved it, you can go onto the next step, which is taking the object selector selecting the letter in the 2nd box, deleting it, selecting the box, making it all the same color, moving it down, and putting the shape on top of it. Then save it through the gif optimizer as luxuryacarablinkie4.
- Now you only need to undo as far as it was in between the 1st and 2nd box, cause you are just going to move it over in between the next 2 boxes anyways.
- You will continue this back and forth until you have all the boxes done with. You know have all your frames made :D Celebrate, cause all you have left is to put the blinkie together.
- It is now time to open up animation shop and put this blinkie together.
- So open up animation shop. There is an animation wizard button, which makes this even easier :P Click on the animation wizard button. Here is what you need to do on each step of the wizard:
Page 1: Have Same size as the first image box checked
Page 2: Have Transparent box checked
Page 3: Have Centered in the frame and with the canvas color boxes checked
Page 4: Have Yes repeat the animation indefinitely box checked. And then for the number in the bottom stuff, put 15.
Page 5: This is where you enter all the frames of your blinkie. So click on Add Image... and then select all the frames of your blinkie. You can select them all at once by holding down the ctrl button while clicking on them, and then you can open them all up at the same time. Now you need to put them in order, so arrange them so 1 is first and then it goes in order down to whatever number your last frame is.
Page 6: Just hit Finish
- Now your blinkie is open in the screen, all the frames are together and you can view it if you want by clicking on the view animation button. Doesn't it look cool, but hey wouldn't it look even cooler if the eyes blinked :D Why yes it would so lets make the eyes blink :P
- Select Frame 3, this will be the frame we have the eyes blink in, once you get more advanced you will do better things, but for now we will just have one frame blink. Click on the eyedropper tool, go to the face area and click on the color of the face. Then click on the magnify glass and zoom in a whole bunch so you can see each pixel and would be able to color in pixel by pixel. Then click on the paint brush tool. Color the eye the color of the face, but be sure to leave the bottom black outline of the eye so it just looks like it is closed. Do this for bother eyes. And then click on the magnify tool and put it back to normal. View your animation and you will see it is blinking at you. Good job. Now you just need to save.
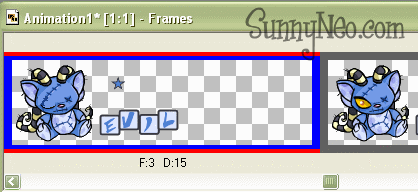
- Go up to file... save as... Now type in the name for your blinkie, I always do what I start off with, so luxuryacarablinkie is the name of mine. Now when you hit save, it will take you through a few steps. This is what you will want to make sure is checked:
Page 1: You want the bar on the left to be up as high as it can go so it is the best image quality.
Page 2: It is optimizing it, so just hit next when it is finished
Page 3: It is showing you the example of your blinkie, how it looked before and now when you have gone through the steps, so just hit next.
Page 4: It is just giving you stats, hit finished and you will have your blinkie all done :D
- Now you have a blinkie. All you need to do is find a spot to host it and then you can put it wherever you like. Try SunnyNeo's Uploading Images Tutorial if you need help uploading your image.

|


 {{ loadingMessage || 'Loading, one moment please'}}

